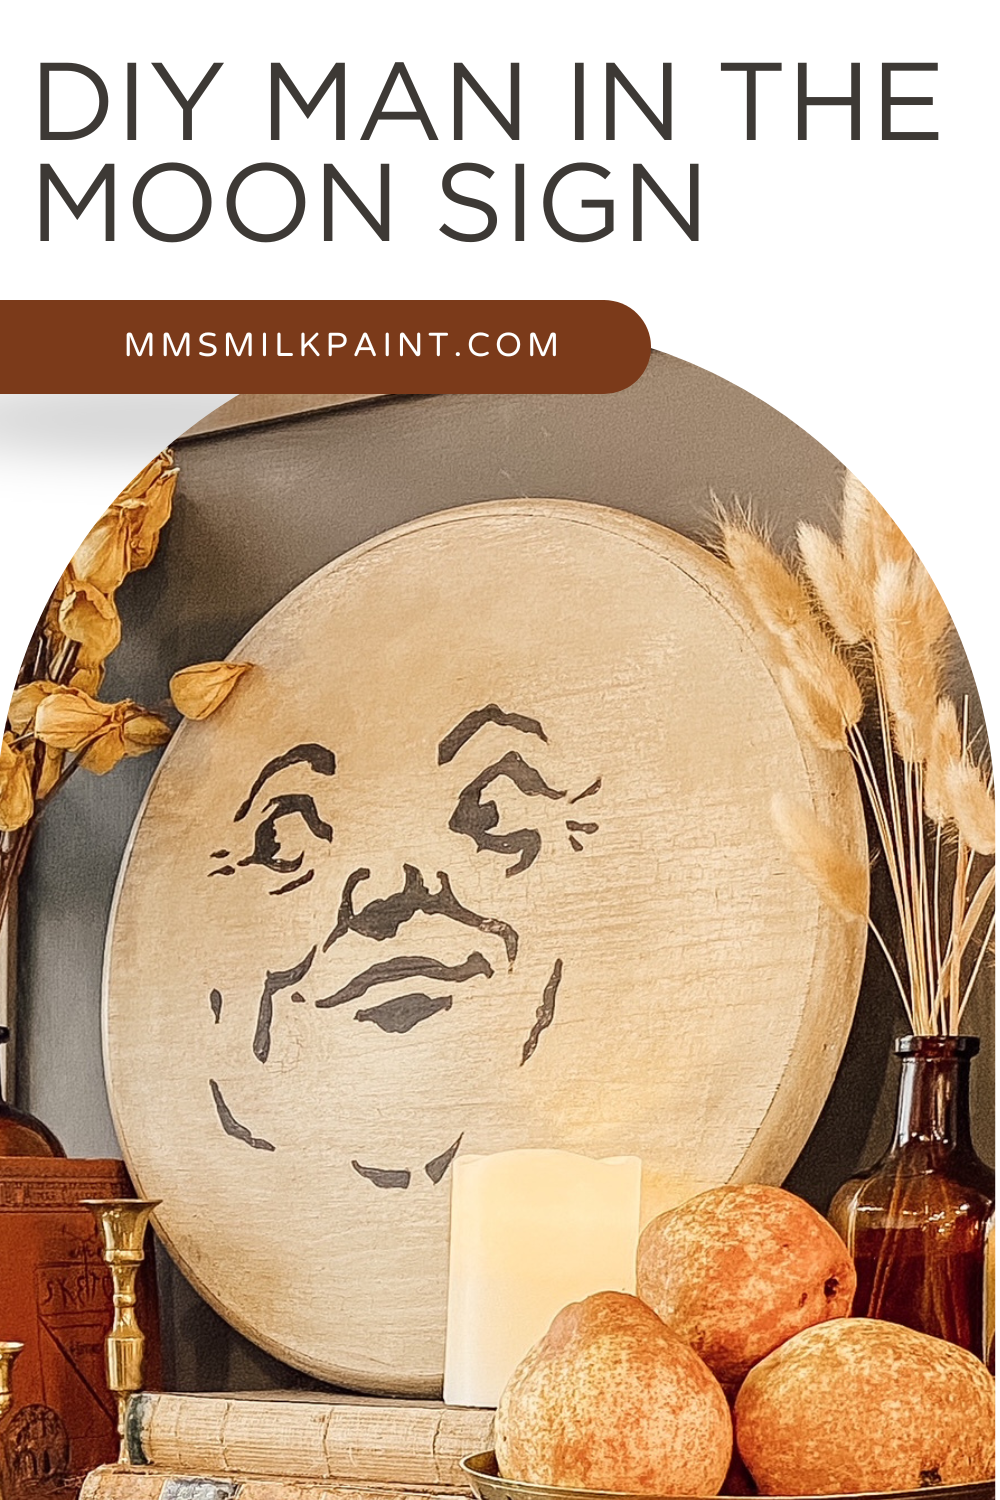
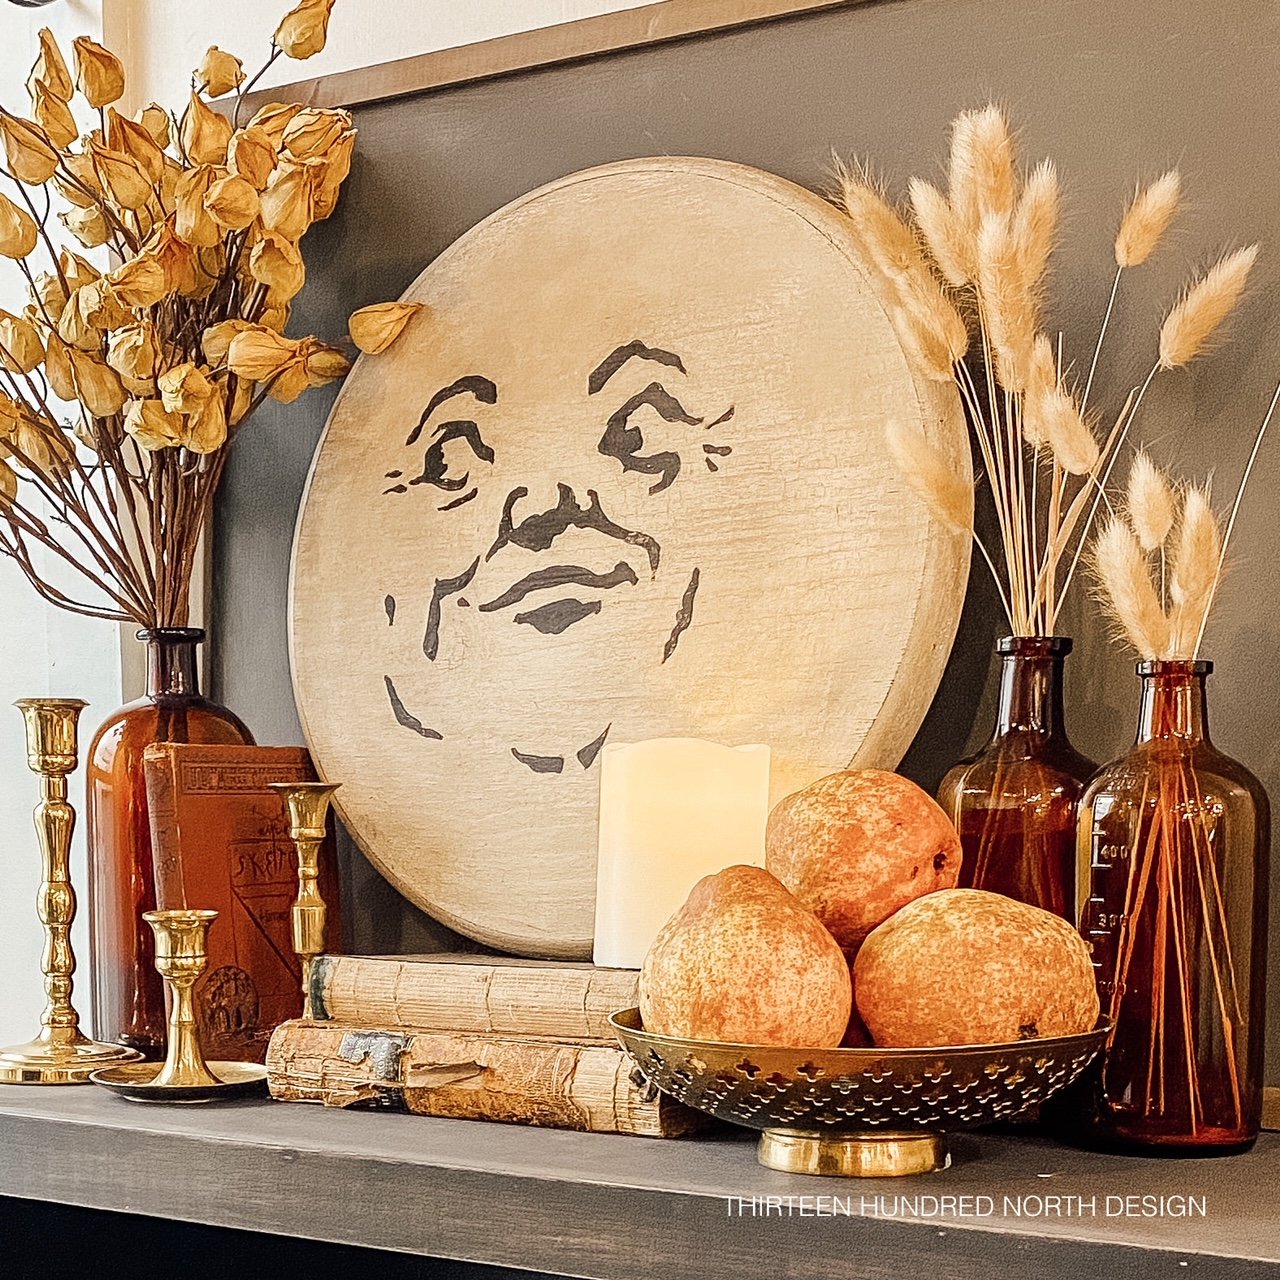
DIY Man in the Moon Sign
Creating the Popular Man in the Moon sign using MilkPaint™

Inspo
I was scrolling through fall decor inspiration a few years ago and came across a vignette that I never stopped thinking about. There was just the right amount of vintage and whimsy with a just touch of Halloween. What drew me to the photo was the sweetest round sign portraying the face of the Man in the Moon; the sign was spooky without being scary. I have been wanting to recreate that sign for my own home and have not gotten around to it until now.
Since seeing that original inspo photo, the Man in the Moon signs have become quite a fall decor staple all over Pinterest, Etsy, and Instagram, so I thought I would write a tutorial about how I made mine using MilkPaint™! I had not yet found MilkPaint™ when I saw the original sign, but now after using it for a few years, I knew it would be the perfect product to achieve that vintage and worn look that drew me to the original photo!
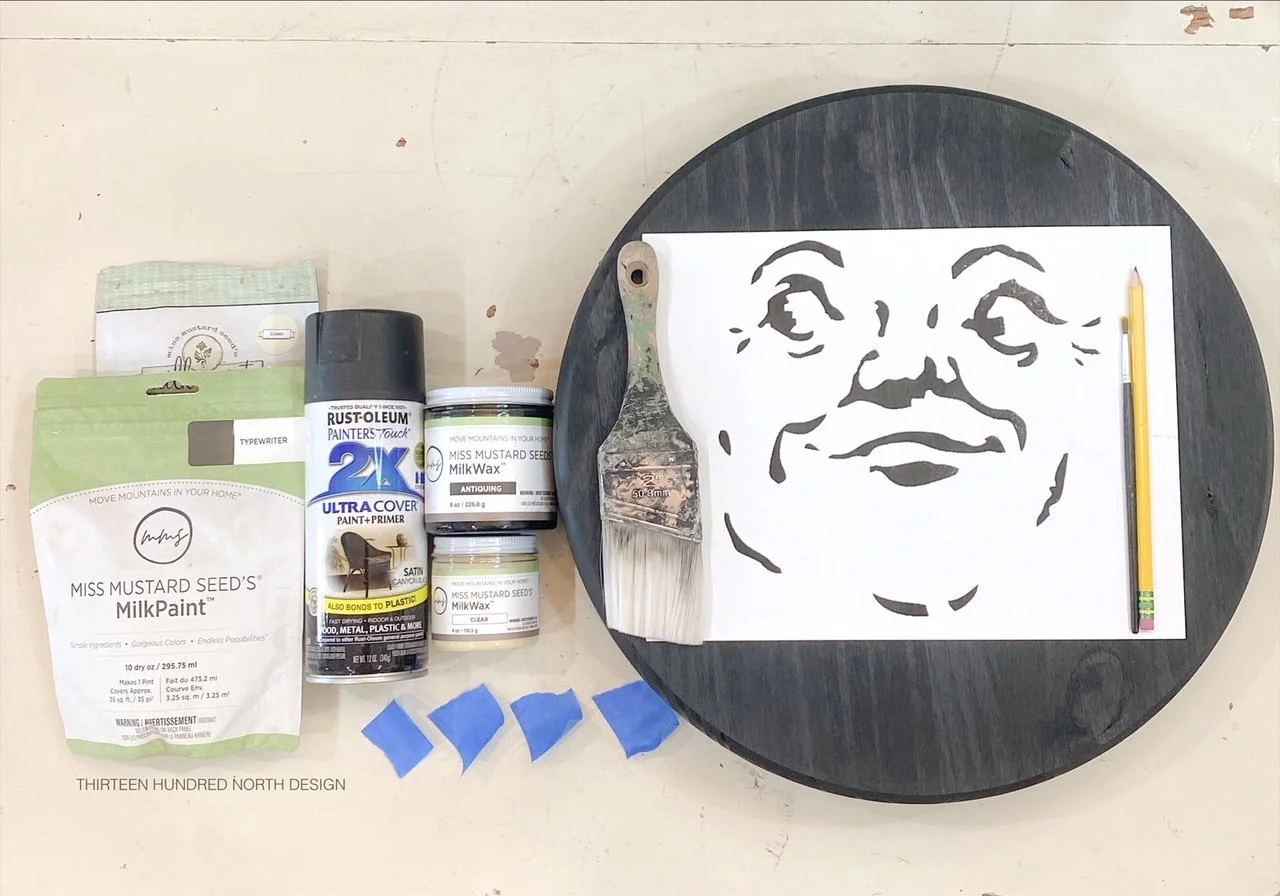
Tools and Materials Used
15” pre-cut wooden circle found at the hardware store
Black spray paint
Miss Mustard Seed’s MilkPaint ™ in Linen
Miss Mustard Seed’s MilkPaint ™ in Typewriter
Printer
Printer paper
Tape
Pencil
2” paintbrush
Small detail paintbrush
Cloth to apply and buff wax
220-grit sanding block
Find or Make a Wooden Circle for Your Sign
For this project, you could certainly create your own wooden circle by cutting it out of a larger piece of plywood you have lying around. I did not want to pull out the power tools, so I opted for a 15” precut wooden circle I found at the hardware store. Many craft stores now carry a variety of pre-cut blank signs and wood rounds as well.
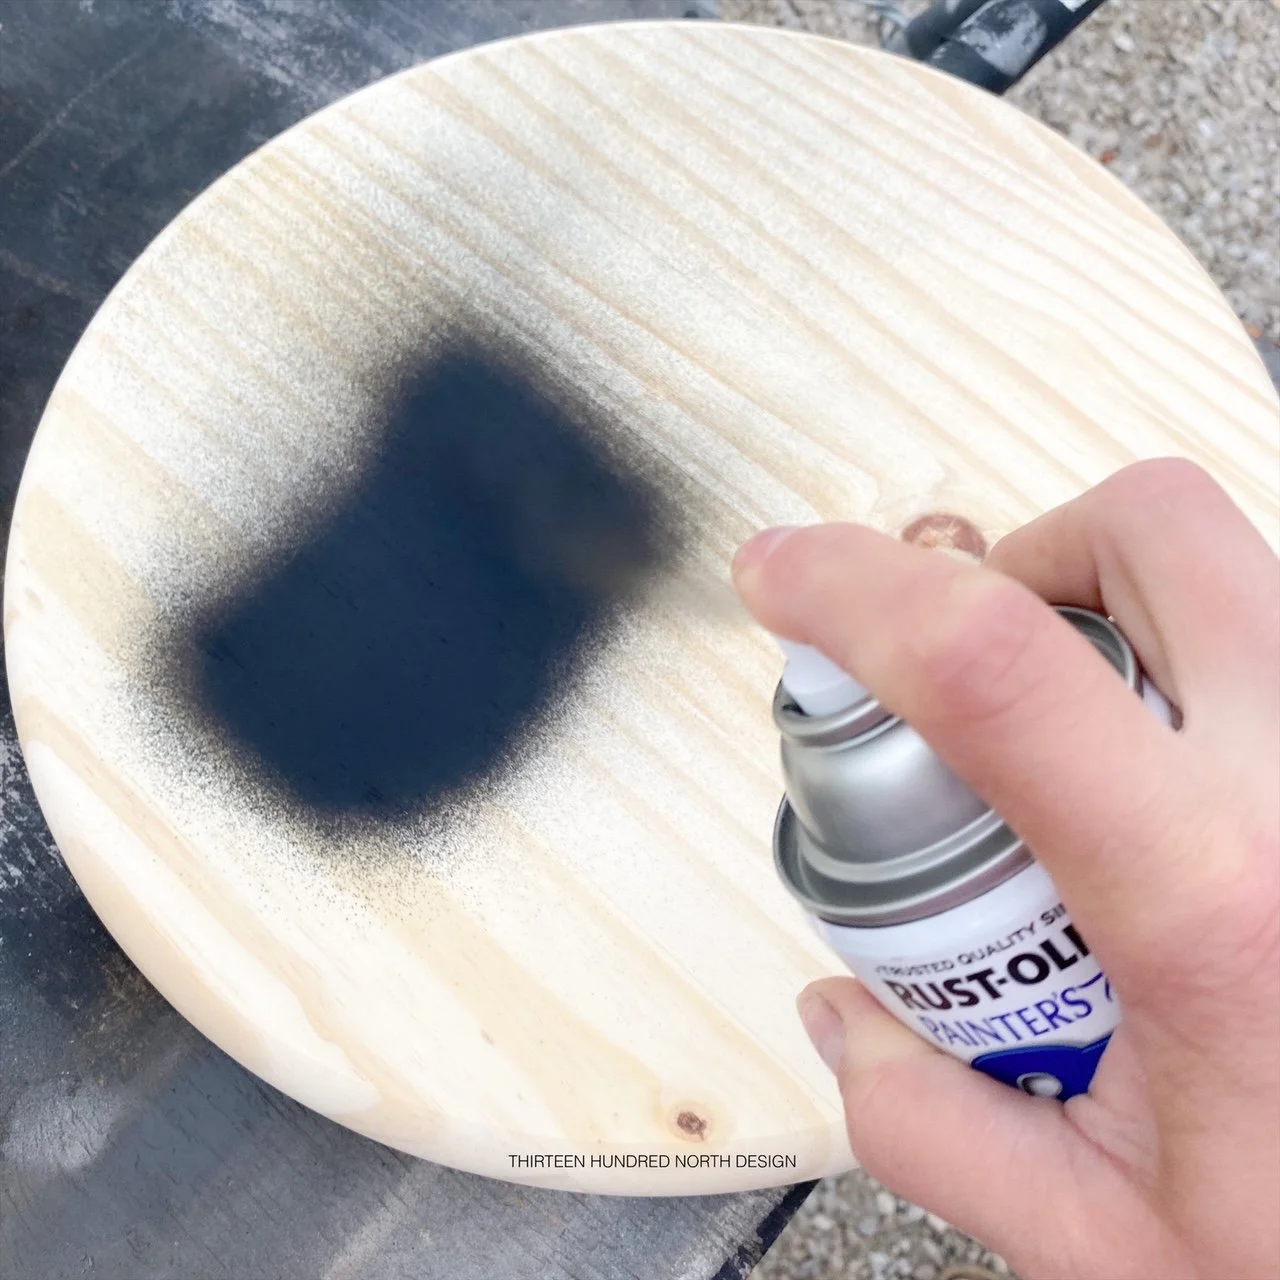
Paint Your Base Layer
Using black or brown spray paint, apply a layer of paint to the front and the back of your wooden circle. This creates a base layer of paint for the milk paint to chip back to and avoids the raw wood look when distressing the corners. Any spray paint with a sheen above satin should give you a nice base layer and entice some chipping and texture from the milk paint.
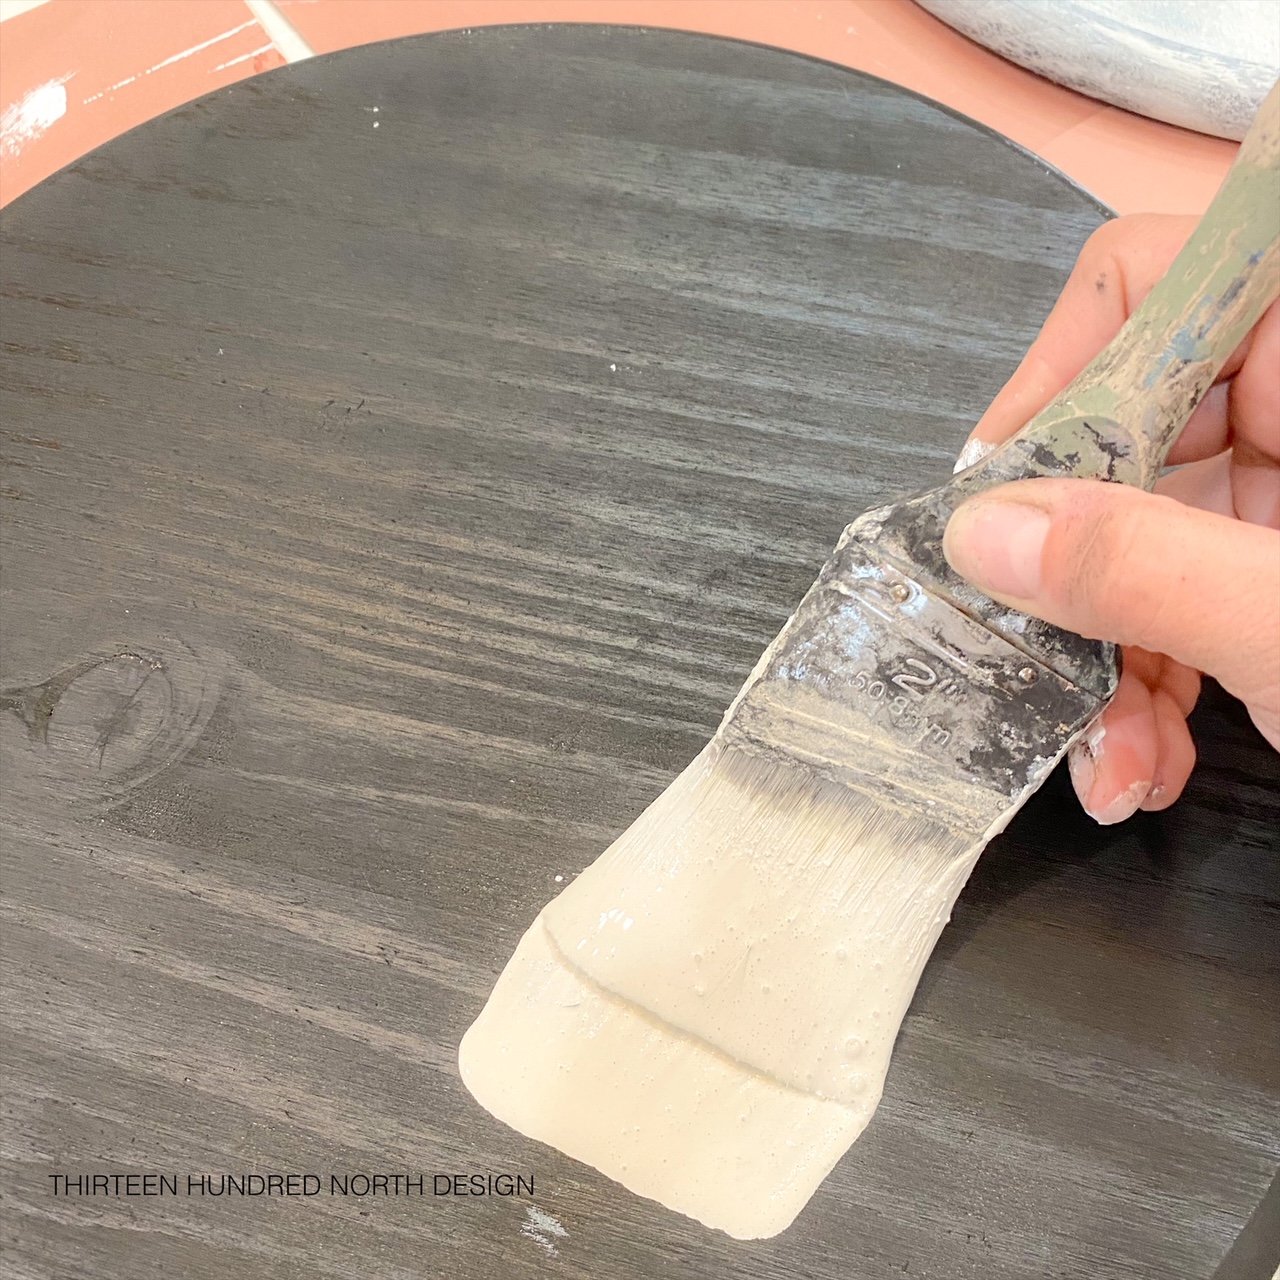
Apply a Layer of Miss Mustard Seed’s Milk Paint™ in Linen
I chose Linen as my color because it had that soft, buttery undertone that reminds me of the moon. Apply a thin layer of MilkPaint™ that was mixed as directed in a 1:1 water to milk paint ratio to the front and back of your wooden circle. If you would like a more textured and crackled look, you can apply your MilkPaint™ before the spray paint is completely dry! The tacky spray will entice a lot of fun texture in the MilkPaint™ layers. I completed this size project with only the sample size of the paint.
Apply a Second Layer of MilkPaint™
Apply a second coat of Linen MilkPaint™ to your sign to ensure all of the black paint layer is covered.
Print out the Image
Use your household printer to print out your Man in the Moon image included in this blog post. You may need to resize your image depending on the size of the wood circle you find. The wood circle I used was 15”, and the image I printed was roughly 8” x 8” overall. I downloaded the photo, opened it to print, removed the margins on my print settings then enlarged the image as large as I could without going off of the paper. I printed in landscape format to allow the image to be slightly larger. Everyone’s printer and method may be slightly different, but that is how I achieved the largest size print, only using one sheet of paper.
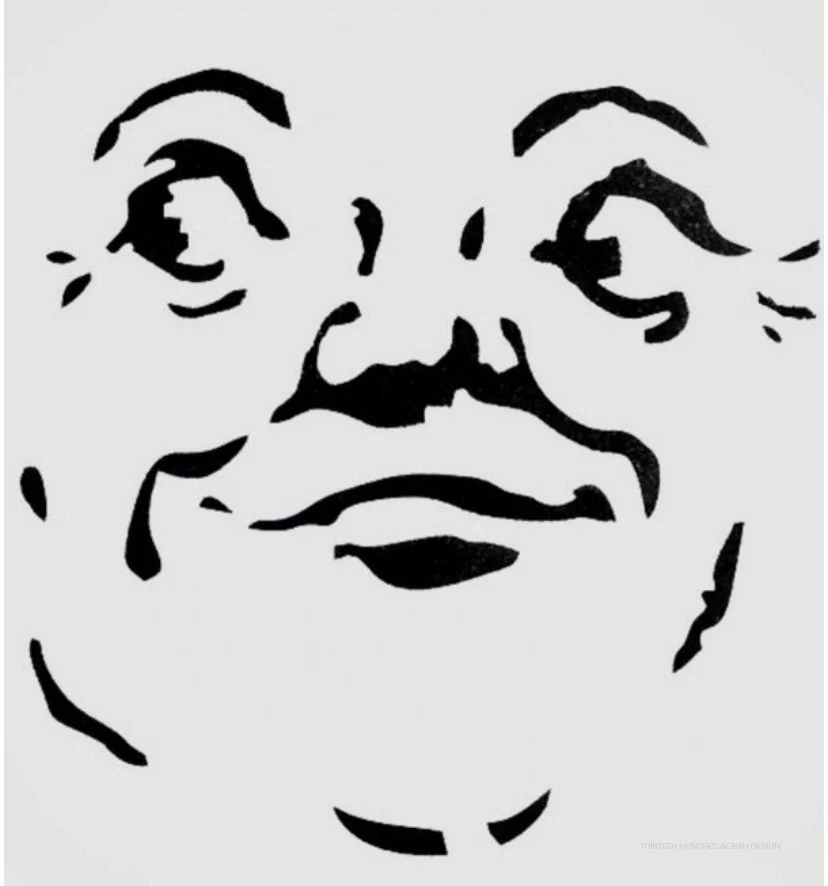
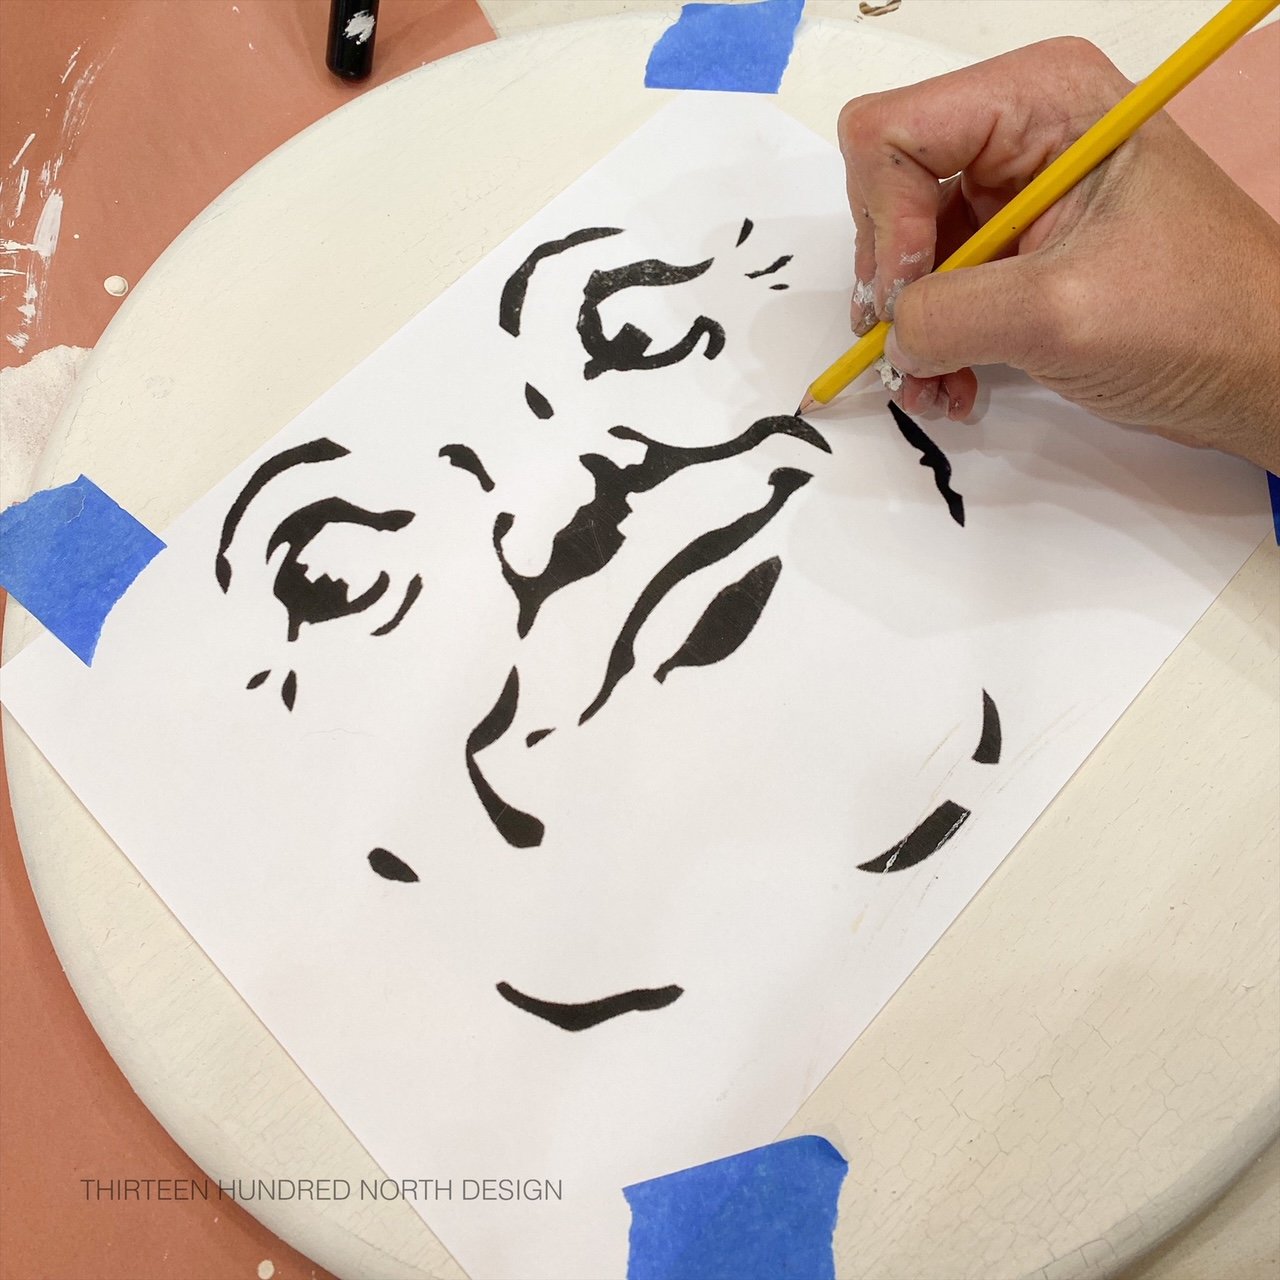
Trace the Outline
Lay down the printed-out face onto your sign and take a few small pieces of tape to hold the paper in position. Using a pencil, outline the face with a good deal of pressure, so the outline makes an impression on the wood below, creating a stencil. Continue tracing until you have all of the lines and features of the face traced onto the wood.
*Side note: For anyone with a vinyl cutting machine, you could certainly cut yourself a stencil using vinyl and skip the tracing step. There are many patterns available online if you search “man in the moon SVG.”
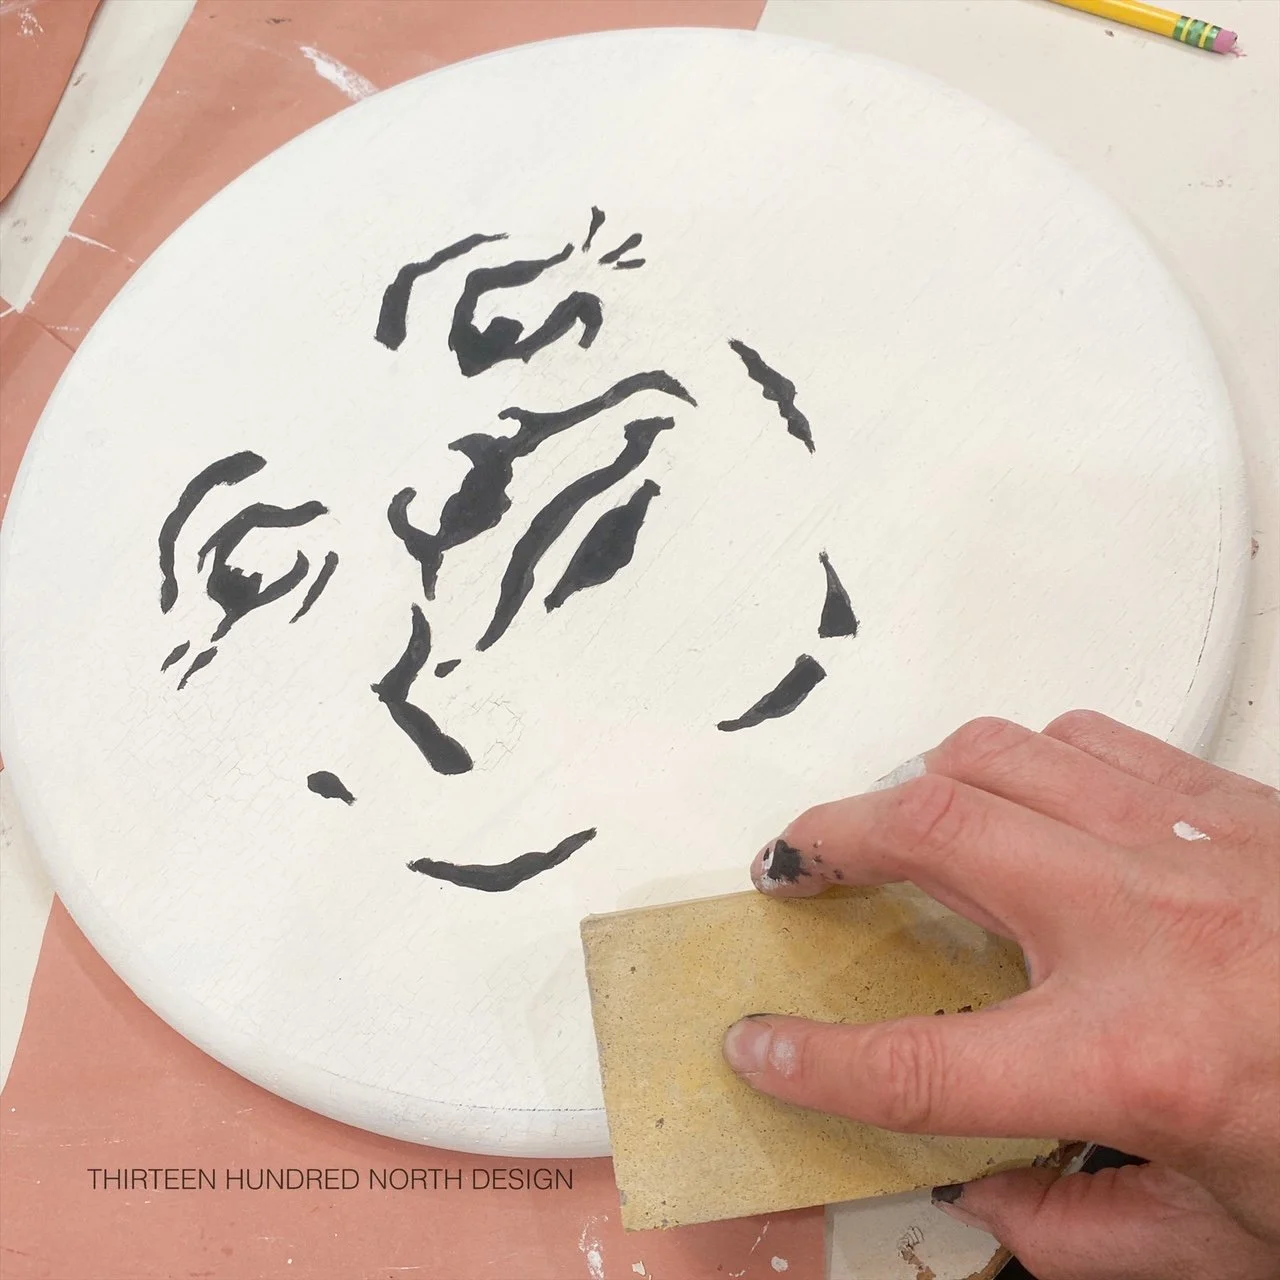
Fill in the Outline You have Created using Miss Mustard Seed’s Milk Paint™ in Typewriter
Mix up a small amount of Miss Mustard Seed’s MilkPaint™ in Typewriter in a 1:1 water to paint powder ratio. Using a small detail paint brush to fill in the areas that were traced out. I only needed ½ TBSP of paint powder for this project.

Touch Up Any Areas on the Face That Need Better Coverage
The black paint may need a few touch-ups, but I only needed one coat of paint.
Sand and Distress
After your paint is completely dry, you can do a bit of distressing. This is when the project really comes to life! Use a 220 or higher grit sanding block and a very light hand to distress around the edges of your circle and lightly sand over the face area to help blend and create that vintage look. Be careful not to over sand and reveal the raw wood underneath your paint. When sanding over the dark facial features, distress in very small areas as not to blend the dark paint powder into your white background.
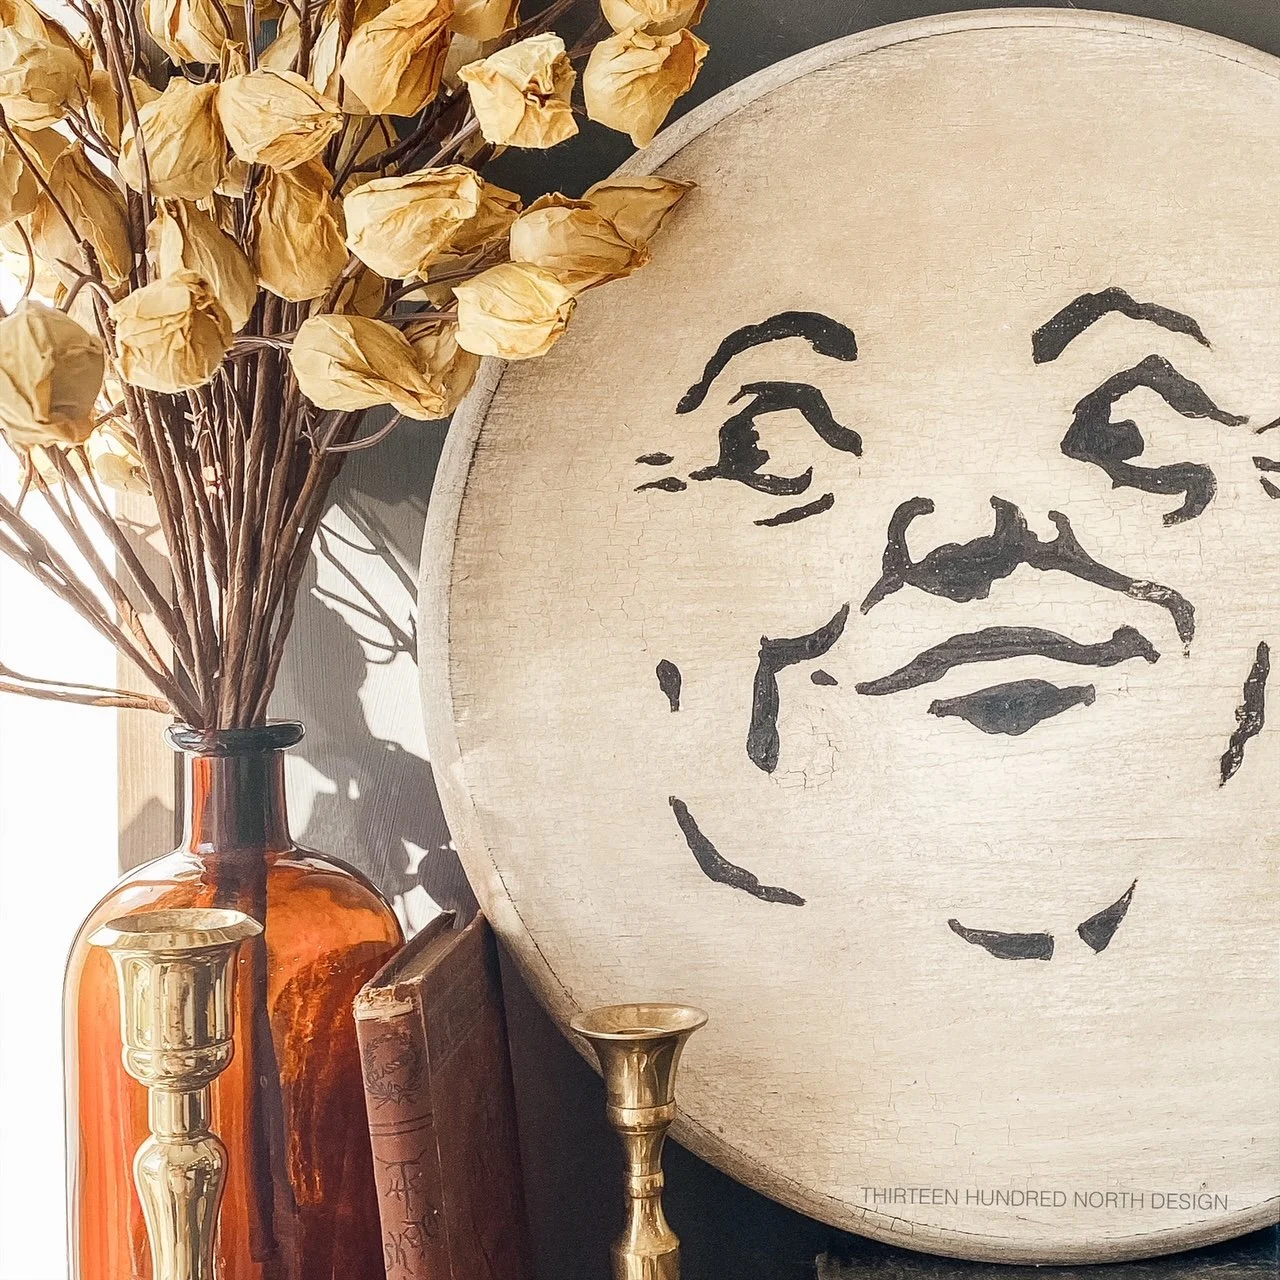
Seal with MilkWax™
You could seal your project with a clear coat, MilkWax™ or MilkOil™. I decided to seal with the MilkWax™ in clear, then use the MilkWax™ in Antiquing to add a bit more depth to the sign, but that step is optional.
Apply a thin layer of the clear wax to seal, then buff back. Using a small brush apply the antiquing wax in any areas you would like to darken a bit, then buff off with a cloth. I blended my antiquing wax by starting heavier on the outside of the circle and fading to the middle using little to no dark wax in the very center of the face, similar to how a face would naturally pick up light in the center.
Ways to Display your Man in the Moon
My inspiration photo showed the moon sign displayed on a mantel with lots of beautiful fall stems; however, the height of my sign was a little too tall to fit onto my fireplace mantel, so I opted to display mine on top of an armoire I had in my living room, and surrounded it with vintage finds in fall colors. I was thinking this sign would also make a really cute door decoration if you added a hanger to the back and glued a few fall stems or dried flowers to the top or bottom corner!
Final Thoughts
This was a fairly simple and straightforward project! No power tools or shop space is needed. I ended up using a hairdryer between coats of paint, and altogether I finished my sign in under an hour, so it was the perfect weeknight or rainy afternoon craft! I adore the way the sign turned out, and I finally have the sign I have been drooling over for years! I have always been mesmerized by the face you see on the moon, especially when it is a big harvest moon peeking up over the cornfield next to my house, and there is dust in the air from the combine in the field.
This time of year feels so spooky and special. I hope you were inspired to create your own Man in the Moon to add a little whimsy and spooky season to your home. Happy Painting!